If you’ve ever looked at your blog page and thought, “This looks… basic,” you’re not wrong.
WordPress gives you a solid foundation, but the difference between decent and premium is in how to build on it.
That’s usually when the conversation shifts to custom layouts.
And honestly? Elementor Pro makes this much easier than people think.
Instead of editing theme files or touching PHP, we discus how to design one layout block and let WordPress repeat it automatically for every post.
That’s your loop grid.
What You’re Actually Building
Before jumping into clicks and settings, understand this:
You’re not building a “grid.”
You’re building one content card.
That card becomes the structure for every post inside the archive.
Once you understand that, everything feels simpler.
Step 1: How to Create the Loop Item (The Card Template)
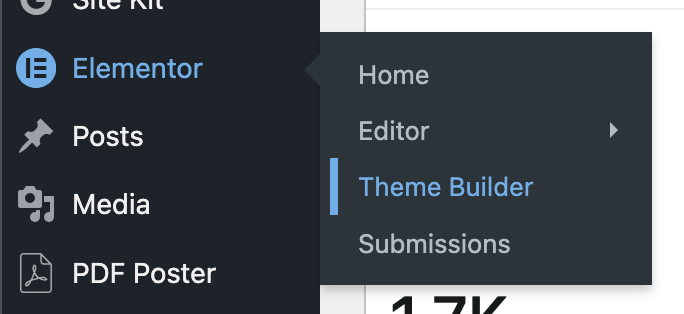
Go to:
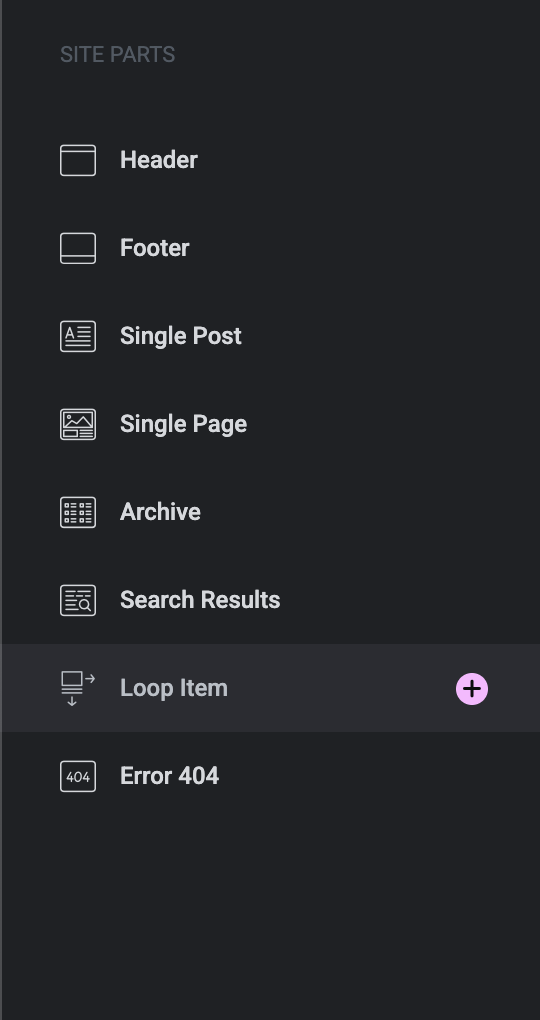
Elementor → Theme Builder → Loop Items → Add New
Choose Loop Item.
Now you’re inside what I like to call the “master card.”
Add what makes sense:
- Featured image
- Post title
- Short excerpt
- A button
Don’t overcomplicate it. A common mistake is trying to stuff too much inside the card.
White space is your friend.
If you’re using custom fields (like reading time, custom badges, pricing, or event dates), pull them in using dynamic tags. Elementor handles that smoothly.
The important part? Whatever you design here will repeat everywhere this template is used.
Change it once, it updates everywhere.
That alone saves hours long-term.
Step 2: Create the Archive Layout
Now we make it display.
Go to:
Templates → Theme Builder → Archive → Add New
Select Archive.
Drag in the Loop Grid widget.
Inside the settings, choose the loop item you just created.
Immediately, you’ll see your posts populating inside that structure.
This is where it starts feeling powerful.
Adjust:
- Number of columns
- Space between items
- Pagination or Load More
- Post count
Keep testing visually as you adjust. Design decisions are easier when you’re seeing real content inside the grid.
Step 3: Control What Shows Up
This part is underrated.
Inside the Loop Grid settings, open the Query section.
Here’s where you decide:
- Which category shows
- Which posts to exclude
- Whether to display custom post types
- How posts are ordered
You can even create completely separate archive designs for different sections of your website.
For example:
Your blog could have one layout.
Your case studies could have another.
Your events could have a totally different structure.
Same system. Different output.
Step 4: Make It Feel Intentional
The difference between a basic grid and a professional one usually comes down to small details.
A slight hover animation.
A subtle image zoom.
Better spacing between cards.
Balanced typography.
Also, adjust columns separately for tablet and mobile. Don’t just rely on automatic stacking.
Three columns on desktop often become one column on mobile. Sometimes two works better. Test it.
Most people skip this part. That’s why most Elementor sites look average.
Step 5: Publish and Set Conditions
When everything looks right, hit Publish.
Elementor will ask where this template should apply.
Choose:
- Entire blog
- Specific categories
- Or a custom post type archive
Set it once. Done.
No manual assigning per page.
Where This Gets Interesting
Loop grids aren’t just for blogs.
You can use the same approach for:
- WooCommerce product listings
- Portfolio sections
- Team pages
- Testimonials
- Event listings
Anywhere content repeats, this system works.
And because it’s inside Theme Builder, you’re not locked into your theme’s limitations.
Final Thoughts
Creating a custom loop grid isn’t complicated.
But doing it thoughtfully makes a noticeable difference.
A structured, intentional content layout:
- Makes browsing easier
- Improves perceived professionalism
- Keeps design consistent
- And makes your website feel built not assembled
Most websites look templated because they rely on defaults.
Once you start controlling your archive structure, your site stops feeling generic.
If You’d Rather Have It Built Properly
If you’re aiming for a WordPress site that feels structured, clean, and professionally engineered not just styled, layout architecture matters.
At WP Consultants, we build Elementor-based systems that go beyond surface design. From custom loop grids to complete Theme Builder frameworks, we structure WordPress sites to be scalable, fast, and conversion-focused.
If you’re ready to move beyond default layouts, let’s build something intentional.